Hello~ ^^
I got the idea to do this off a video I saw on youtube! :D
Disclaimer: I am FAR from pro at makeup, so not everything I say here is necessarily 100% right! This is just based on what I've learned from my past experiences~
I've been experimenting with makeup for about 4-5 years now, and wearing makeup on a regular basis for 2 years, so I still have a long way to go! >_<
So in no particular order:
1. Not using concealer
Until about 2 years ago, I just put foundation over my entire face until my blemishes were pretty much covered. Yeah... Don't do that ^^;
What works better (at least for me), is to put a fairly thin layer of BB cream (for everyday wear) or foundation (for heavier makeup looks) to even out skin tone, and then use concealer to add extra coverage over areas that need it, like over blemishes or dark circles.
2. Not matching my foundation
Again, until quite recently, I never matched my foundation properly. I just bought colours that looked 'close enough' without really thinking about it. I always ended up getting foundations too dark/orange for my skin, which was especially bad, because I tend to prefer looking a bit lighter >_<
Now, I use mostly BB creams for everyday wear since it's better for your skin, and since most asian BB creams are made to suit oriental skin tones, the colour almost always matches me perfectly. When it comes to foundation, I've gotten WAY better at estimating what colours will match me well, but I always try the testers first if at all possible.
3. Just putting black eyeliner all round my eye.
Some people look amazing with any style of eyeliner, including just a black rim around their entire eye. I am NOT one of those people. When I first started out with eyeliner, I completely disregarded my eye shape, and would just draw around my entire eye with black eyeliner. It ended up just making my small eyes look even smaller >_< (Also, totally emo XD)
I've found that what tends to look better for me is top liner only for a light everyday look, and for heavier looks, I need to vary the line length/placement etc.
I'm not going into detail for this one, because very different eyeliner looks good on different people~
4. Using just my favourite colours
There are very few skin tones where every colour looks good, and it took me a while to realise this. I used to love pinks and purples, so I used those eyeshadow colours, which just ended up making my eyes look a bit swollen ^^;
I find that for my skin tone, I should stick to neutrals, blacks/whites or bright cool colours. This is another one that varies person to person of course~
5. Not doing my eyebrows
My natural eyebrows aren't very sparse or very thick, but are far from perfect, with quite a lot of stray hairs, which I used to just ignore.
Eyebrows make a huge difference to the overall face, so it's important to keep them nice and clean looking! Even if you don't want to change their shape, it's still good to get rid of the messy stray hairs around the main shape to give a neater look. I have a full front fringe these days, so you actually can't see my eyebrows, but I make sure to fix them up every week or 2, just in case~
6. Not matching my eyebrow colour
I put highlight in my hair for the first time when I was 13, and dyed it fully when I was 15, so I haven't had completely black hair for many years now, even though it's still pretty dark. I would fill in my eyebrows with a black eyeshadow or eyebrow pencil, and never noticed how harsh and strange it looked.
Now that my hair is a medium-dark brown, I need to fill in my brows with a medium/light brown if I want to show them without looking strange, since they're naturally black. Thinning out my eyebrows and filling them in with colour is especially important when I cosplay and wear different wigs. For me, I've found that with dark hair, the eyebrows look best a shade or two lighter, and with light hair, the eyebrows look best the same colour, or slightly darker. I've seen waaaaay too many girls walking around with light hair and black eyebrows, don't be one of them! >_< (Unless you're doing it on purpose of course XD)
7. Not using eye primer
I have incredibly oily eyelids (and super dry skin almost everywhere else >_>), and my eyeliners and eyeshadows crease/smudge really easily. When I wore just liner on my top lid, it would smudge on the outer corner within a few hours of putting it on, and even with touchups, by the end of the day, my makeup would look very messy.
I'm quite obsessive with eye primers now, I never wear eye makeup without it! If you have monolids, small eyelid folds, or oily eyelids, a good eye primer will most likely allow your makeup to stay on for longer without smudging or creasing~
8. Not doing any conturing, highlighting or applying blush
I first started doing makeup on a regular basis because of cosplay, and since anime characters' faces are just one colour, I would only ever put one colour of foundation/BB cream (often a little lighter than my natural skin colour) over my face and move on. And then, one day, I looked at my face in the mirror at school under bright lighting, and I looked almost sickly O_o
I have a very wide and flat face, so a little bit of very basic conturing does a lot. Also, applying base makeup tends to cancel out any natural pinkness in the cheeks, making you look a bit washed out and unhealthy. When time allows, I always make sure to apply at least a little bit of blush for a natural glow.
9. Buying only cheap makeup
Although many cheaper makeup brands have some pretty good stuff, I was not good at finding them when I was younger. I would usually buy the least expensive things I could find, since I didn't have much money. Combined with my oily eyelids and no primer, cheap eye makeup just would not stay for very long.
I still don't tend to buy high end makeup, since I'm still a student, but I've gotten better at deciding what cheap products are good to use (Eg. Eyeshadows, brushes), and what products I should invest a bit more in (Foundation, eyeliner etc.)
10. Not checking my makeup under different lighting/in different mirrors
Bright lighting like in my bathroom, and slightly dirty/scratched compact mirrors can make your makeup and skin look better and smoother than it really does. I never used to check my makeup under natural lighting, in a perfectly clean mirror before going out, so my makeup would sometimes be messy/uneven, and I would not even notice it unless someone pointed it out (Which nobody really ever does)
I always make sure to take a proper look at my makeup before going out these days, ESPECIALLY if I'm going to be taking photos, just in case~ ^^
So those are my 10 makeup mistakes I've made in the past! Of course, these are not even half of the mistakes that I've ever made, and I am still making heaps of makeup mistakes even now, so hopefully I will continue to learn from my mistakes! ^^
~ アキ
Showing posts with label Makeup. Show all posts
Showing posts with label Makeup. Show all posts
Saturday, 2 June 2012

Saturday, 21 April 2012
Dolly Wink No. 2 Sweet Girly + No. 6 Baby Cute
Hey guys!~ ^^
I've always been a huge fan of Tsubasa (She's so gorgeous~ X3), and I've recently started collecting stuff from Dolly Wink! So far I have the eyeliner (haven't tried yet) plus 4 boxes of falsies from the original series~ ^^
I really love Tsubasa's makeup, because it's not super super dramatic like a lot of other gyarus, but still very pretty and dolly~
I'll also start collecting Candy Doll products when my current heap of makeup starts to run out/expire~ :D
No. 2 Sweet Girly was the first pair of Dolly Wink eyelashes I bought, and No. 6 Baby Cute was the first pair of bottom lashes I bought. It wasn't until almost a month later that I realized they are supposed to be worn together~ (Skills!) ^^
Now, on with the review!~
No. 2 Sweet Girly

Packaging: 10/10
The packaging is super pretty of course! It's easy to open (I cannot stand packaging that is really strongly sealed and takes forever to open >_<), and has a nice little box inside the main box that's easy to carry around in my bag.
Design: 9/10
I absolutely love the design, it's very flattering and as natural looking as lashes this dramatic can possibly look~ XD
The thick part near the middle emphasizes the middle of the eye and makes it look wider which I really love.
They're perfect for me since I love wearing quite heavy makeup when I go out, but should probably be saved for special occasions if you prefer to wear mostly light makeup.
The only (tiny) problem was that these lashes need to be curled before or after you put them on, or else they tend to look quite droopy (unless you like that look?), I had to curl mine before and after applying them for them to curl up significantly~
Also the band is really loooooong because I have small eyes! Even though I wear my lashes with at least a few millimeters extra to extend the eye, it was still a little bit too long. It would be the perfect length for people with big eyes though!
Comfort: 9/10
The band is flexible and easy to apply into the shape that you want, although they are quite long, they are not too heavy, although they do start to feel a bit heavy after wearing them for 12+ hours, but that is to be expected~ XD
Price: 7/10
I've looked around in almost every asian makeup store in the city over here, and the cheapest price that I found was $21.95 AUD, which is quite expensive, considering I've bought boxes of 10 lashes for less than $20, however, the price in Japan/China is a fairly reasonable $13-15 AUD. Also, the quality/design of these are far more flattering than most eyelashes from Australian brands that I've tried that cost around $10 a pair, so can't really complain~ ^^
It also comes with a little tube of eyelash glue, the glue works well, and there is quite a generous amount.
Reusable? 9/10
Yes! I used my first pair of No. 2 at least 6-8 times (My memory sucks) before it started to lose it's shape and glue started to get everywhere, and I wasn't particularly careful with it either, so the quality is definitely good! Considering I paid $11 for each pair and used it about 7 times, that's less the 2 dollars per use.
Overall: 9/10
I love these and am definitely stocking up at least a box or two next time I go to Japan! ^^
No. 6 Baby Cute

Packaging: 10/10
Same as No. 2, the packaging is gorgeous! This shade of pink is so pretty~ :3
Design: 9/10
I was a little bit iffy about the design when I first saw it in the box, but they looked amazing on Tsubasa (doesn't everything?) and I had a bit of extra money, so I thought why not? Each of the little sections are separate which I didn't realize until I tried them up, and then were quite hard to apply.
HOWEVER, they looked awesome! ... Or at least I think that they do?
I used a bit of light eyeliner/eyeshadow as a guideline for where to stick them, and used tweezers to apply them, and it actually didn't nearly look as strange as I had expected, although it did take quite a few minutes to get them all on. The separate chunks also mean that you don't need to worry about bending the bands into shape, which is something that is a huge relief to me, since the bands of bottom lashes usually hate me. XD
Comfort: 10/10
These are super comfortable since they don't have a whole band, and I could barely feel them at all. The only problem with this is that I'm constantly paranoid and checking if they're still stuck on ^^;
Price: 7/10
Again, the same as before, a bit on the expensive side over here, but well worth it! ^^
Reusable? 8/10
I've used the first pair 3 times already and they're still fine to reuse. The only problem (and this might just be me) is that since you need tweezers to apply them, I sometimes squeeze a bit too hard and ruin the shape of the lashes >_<
Overall: 9/10
They're my new favourite bottom lashes, but they're definitely not for people who think that spending more than 30 minutes on makeup is too long~ XD
Here's a few photos of what they look like on me~ ^^
(Might add a few more after this weekend~)


I've always been a huge fan of Tsubasa (She's so gorgeous~ X3), and I've recently started collecting stuff from Dolly Wink! So far I have the eyeliner (haven't tried yet) plus 4 boxes of falsies from the original series~ ^^
I really love Tsubasa's makeup, because it's not super super dramatic like a lot of other gyarus, but still very pretty and dolly~
I'll also start collecting Candy Doll products when my current heap of makeup starts to run out/expire~ :D
No. 2 Sweet Girly was the first pair of Dolly Wink eyelashes I bought, and No. 6 Baby Cute was the first pair of bottom lashes I bought. It wasn't until almost a month later that I realized they are supposed to be worn together~ (Skills!) ^^
Now, on with the review!~
No. 2 Sweet Girly

Packaging: 10/10
The packaging is super pretty of course! It's easy to open (I cannot stand packaging that is really strongly sealed and takes forever to open >_<), and has a nice little box inside the main box that's easy to carry around in my bag.
Design: 9/10
I absolutely love the design, it's very flattering and as natural looking as lashes this dramatic can possibly look~ XD
The thick part near the middle emphasizes the middle of the eye and makes it look wider which I really love.
They're perfect for me since I love wearing quite heavy makeup when I go out, but should probably be saved for special occasions if you prefer to wear mostly light makeup.
The only (tiny) problem was that these lashes need to be curled before or after you put them on, or else they tend to look quite droopy (unless you like that look?), I had to curl mine before and after applying them for them to curl up significantly~
Also the band is really loooooong because I have small eyes! Even though I wear my lashes with at least a few millimeters extra to extend the eye, it was still a little bit too long. It would be the perfect length for people with big eyes though!
Comfort: 9/10
The band is flexible and easy to apply into the shape that you want, although they are quite long, they are not too heavy, although they do start to feel a bit heavy after wearing them for 12+ hours, but that is to be expected~ XD
Price: 7/10
I've looked around in almost every asian makeup store in the city over here, and the cheapest price that I found was $21.95 AUD, which is quite expensive, considering I've bought boxes of 10 lashes for less than $20, however, the price in Japan/China is a fairly reasonable $13-15 AUD. Also, the quality/design of these are far more flattering than most eyelashes from Australian brands that I've tried that cost around $10 a pair, so can't really complain~ ^^
It also comes with a little tube of eyelash glue, the glue works well, and there is quite a generous amount.
Reusable? 9/10
Yes! I used my first pair of No. 2 at least 6-8 times (My memory sucks) before it started to lose it's shape and glue started to get everywhere, and I wasn't particularly careful with it either, so the quality is definitely good! Considering I paid $11 for each pair and used it about 7 times, that's less the 2 dollars per use.
Overall: 9/10
I love these and am definitely stocking up at least a box or two next time I go to Japan! ^^
No. 6 Baby Cute

Packaging: 10/10
Same as No. 2, the packaging is gorgeous! This shade of pink is so pretty~ :3
Design: 9/10
I was a little bit iffy about the design when I first saw it in the box, but they looked amazing on Tsubasa (doesn't everything?) and I had a bit of extra money, so I thought why not? Each of the little sections are separate which I didn't realize until I tried them up, and then were quite hard to apply.
HOWEVER, they looked awesome! ... Or at least I think that they do?
I used a bit of light eyeliner/eyeshadow as a guideline for where to stick them, and used tweezers to apply them, and it actually didn't nearly look as strange as I had expected, although it did take quite a few minutes to get them all on. The separate chunks also mean that you don't need to worry about bending the bands into shape, which is something that is a huge relief to me, since the bands of bottom lashes usually hate me. XD
Comfort: 10/10
These are super comfortable since they don't have a whole band, and I could barely feel them at all. The only problem with this is that I'm constantly paranoid and checking if they're still stuck on ^^;
Price: 7/10
Again, the same as before, a bit on the expensive side over here, but well worth it! ^^
Reusable? 8/10
I've used the first pair 3 times already and they're still fine to reuse. The only problem (and this might just be me) is that since you need tweezers to apply them, I sometimes squeeze a bit too hard and ruin the shape of the lashes >_<
Overall: 9/10
They're my new favourite bottom lashes, but they're definitely not for people who think that spending more than 30 minutes on makeup is too long~ XD
Here's a few photos of what they look like on me~ ^^
(Might add a few more after this weekend~)

No. 2 + No.6

No. 2 + No. 6
The top ones tend to droop after wearing them for a few hours~ >_<
Thursday, 1 December 2011
Top 10 Essential Makeup/Skincare Products~
Hey guys!~
Recently, a few of my friends from school have just started learning about the basics of makeup, so I got the idea to write about what I would consider to be the 10 most important makeup and skincare products, that I would recommend for everyone to have~ ^^
(Disclaimer: I am no expert on makeup, but I've been experimenting with makeup quite a lot for about 4 years now, so this is advice from what I've learnt so far!~ ^^)
1. Moisturizer
A good moisturizer that suits your skin type is really important! Especially if you have dry, flaky skin, a suitable moisturizer is absolutely essential, and even if you have oily skin, it's still good to use a light moisturizer. If you have combination skin like I do, try using two separate moisturizers: a richer one on the drier parts of your skin, and a lighter one on the more oily parts, it really does make a difference!

2. Brushes
They're not exactly makeup products, but having a small range of brushes makes a huge difference when applying even very basic makeup, I learned this the hard way! You don't need a huge amount of very expensive professional brushes, especially to begin with, just a small kit of about 5 or so brushes will do: One large foundation/blush brush, at least two eyeshadow brushes of different sizes, one sponge tip brush, and one pointed or angled eyeliner brush
I would recommend buying brushes in a set rather than separately, as a set is usually better value (One brush of decent quality usually costs upwards of $5AUD, whereas a pretty good set of 5+ brushes can cost as little as $10-20), and gives you a good assortment of brushes.
Remember to keep your brushes clean!

3. Concealer
It's quite safe to say that everyone gets blemishes occasionally, some people more than others, and concealer is the best way to cover them up. Although small spots can be covered up with foundation, darker blemishes and under eye shadows often cannot be, no matter how much you apply. However, they can be fixed with just a small amount of concealer~
When buying concealer, always go for a shade lighter than your skin tone for maximum effectiveness.

4. Foundation
A good foundation (or BB cream) is absolutely indispensable! A bit of coverage can be the difference between dull, slightly unevenly toned skin, and bright, smooth looking skin! Finding the right shade of foundation isn't difficult, as long as you put in a bit of effort. Make sure to always try a foundation before buying it, and be sure that it is what you are looking for. Since foundation is used on a large area of your face, don't skimp and buy a cheap brand, if there is one type of makeup that is worth paying a bit of extra money for, it's foundation!

5. Makeup Primer
Primer is applied before makeup, smoothing out the skin to make a good base, and helps your makeup last longer without smudging. The two main types of primer are foundation primer which is applied all over your face before foundation, and eye primer, which is applied on your eyelid before eye makeup.
I personally do not use foundation primer (because I'm lazy), but eye primer is something I have used quite obsessively since I discovered it! I have noticed that my eyeshadow colours look much more vibrant and holds better when I use a primer, and my eyeliner does not smudge off like it used to.

6. Eyeliner
A basic black or brown eyeliner is very easy to find, and even one of decent quality shouldn't cost a fortune. There are 3 main types of eyeliner: Pencil liner, liquid liner, and gel liner.
Pencil liner is great to begin with, it smudges out quite easily for a softer look, and is usually easier to remove, and harder to mess up with.
Liquid liner can come in a little container with a brush, or as a brush pen. I find pen liquid liners to be the most convenient and easy to use, and is great if you want darker, sharper lines. I usually carry around a pen liquid liner when I go out, since it's great for quick makeup touchups.
Gel liner is similar to liquid liner, it generally comes in a little container, sometimes with a brush (However, I'd recommend buying your own brush, a small angled brush is best). I find that gel liner tends to last longer, so I actually prefer to use gel liner over liquid liner when I cosplay or wear heavy makeup.

7. Eyeshadow
A small palette of eyeshadows in colours that are flattering to your features may not seem like much, but it can really help brighten up your eyes. For a natural look, you want to stick to beiges and browns, mostly just to create a bit more depth, but I personally love experimenting with lots of different colours and combinations of eyeshadows to create new looks.
My recommendation would be to buy an assortment of inexpensive eyeshadows to try out in order to find your best colours, before investing more money into good quality ones. Remember, your favourite colours aren't always the ones that look best! (Another thing I learned the hard way...)
Eyeshadows can also be used to fill in and define your eyebrows, giving you a nicer, tidier look overall. (I don't really like eyebrow pencils, they are a bit too harsh looking for my tastes~)

8. Mascara
Although I have a small obsession with wearing false eyelashes, a good quality mascara is still something I consider really important to have.
Mascara is something that is worth paying a proper amount for, cheap mascaras just don't cut it, especially if you have short eyelashes. I find that curling your eyelashes and applying mascara really opens up the eyes. Layering different mascaras is great if you have short eyelashes, using a lengthening mascara under a thickening one can really give your eyelashes (and your overall look) a huge boost!
For school, I'm usually too lazy to put on much makeup at all, but I almost always curl and mascara my eyelashes. I only use waterproof mascara because it holds curl better, the other ones weigh my eyelashes down~

9. Makeup Remover
As great as makeup is, it is obviously not good for your skin if it is left on for a long time, so a good makeup remover is almost just as important as good makeup. Acne/pimples/blemishes can be easily caused by not removing your makeup properly, and can be just as easily prevented. Make sure to get a good makeup remover that works for your skin type, especially is you have sensitive skin like me. I find that many makeup removers irritate my skin, so do be careful when you buy one!

10. Facial Cleanser/Scrub
Cleansing and exfoliating is quite basic skincare. It removes impurities, as well as dead skin cells, giving you nicer, smoother skin. There are so many types of cleaners and scrubs to choose from(Blackhead removing, oil control, brightening etc.), so it's probably best to choose a few, and switch between products regularly for a wider range of benefits, and so that your skin does not get immune to it.
When it comes to scrubs, be careful when choosing one if you have sensitive skin. Very coarse scrubs can irritate your skin, and cause more harm than good. Try to find a product with less and smaller grains in it~

Other Highly Recommended Products:


And that's it! I know it might sound like a lot to have, but trust me, it really isn't~ XD
Over the years, without even trying to, I've built up quite a large collection of makeup, much more than what I have suggested here! ^^;
It's not much compared to those (lucky) people with entire suitcases full of makeup, but it's quite a bit for a teenager with strict and disapproving asian parents~ XD
And another thing: Even if you don't finish using a makeup product, don't just keep it for ages! If you use very old makeup, it can irritate your skin and eyes! >_<
As a very rough guide, never keep liquid/cream products (Liquid eyeliner, mascara, liquid/cream foundation etc.) for longer than a year, and dry products (Power eyeshadows, powder foundation etc.) should be replaced at very least once every two years. Note that these are the absolute maximum time limits, most people would tell you to replace these products much more often!
I hope that you guys will find this guide somewhat useful!~ ^^
~アキ
P.S. Please leave a vote on my polls so I know what I should post next!~ ^^
Recently, a few of my friends from school have just started learning about the basics of makeup, so I got the idea to write about what I would consider to be the 10 most important makeup and skincare products, that I would recommend for everyone to have~ ^^
(Disclaimer: I am no expert on makeup, but I've been experimenting with makeup quite a lot for about 4 years now, so this is advice from what I've learnt so far!~ ^^)
1. Moisturizer
A good moisturizer that suits your skin type is really important! Especially if you have dry, flaky skin, a suitable moisturizer is absolutely essential, and even if you have oily skin, it's still good to use a light moisturizer. If you have combination skin like I do, try using two separate moisturizers: a richer one on the drier parts of your skin, and a lighter one on the more oily parts, it really does make a difference!

Baviphat Peach All-in-one Waterfull Cream
2. Brushes
They're not exactly makeup products, but having a small range of brushes makes a huge difference when applying even very basic makeup, I learned this the hard way! You don't need a huge amount of very expensive professional brushes, especially to begin with, just a small kit of about 5 or so brushes will do: One large foundation/blush brush, at least two eyeshadow brushes of different sizes, one sponge tip brush, and one pointed or angled eyeliner brush
I would recommend buying brushes in a set rather than separately, as a set is usually better value (One brush of decent quality usually costs upwards of $5AUD, whereas a pretty good set of 5+ brushes can cost as little as $10-20), and gives you a good assortment of brushes.
Remember to keep your brushes clean!

Cerro Queen Brush Set + 2 random brushes~ XD
3. Concealer
It's quite safe to say that everyone gets blemishes occasionally, some people more than others, and concealer is the best way to cover them up. Although small spots can be covered up with foundation, darker blemishes and under eye shadows often cannot be, no matter how much you apply. However, they can be fixed with just a small amount of concealer~
When buying concealer, always go for a shade lighter than your skin tone for maximum effectiveness.

NYX Concealer in a Jar
4. Foundation
A good foundation (or BB cream) is absolutely indispensable! A bit of coverage can be the difference between dull, slightly unevenly toned skin, and bright, smooth looking skin! Finding the right shade of foundation isn't difficult, as long as you put in a bit of effort. Make sure to always try a foundation before buying it, and be sure that it is what you are looking for. Since foundation is used on a large area of your face, don't skimp and buy a cheap brand, if there is one type of makeup that is worth paying a bit of extra money for, it's foundation!

Etude House Precious Mineral BB Cream, Skin79 Super+ Beblesh Balm, NYX Twin Cake
5. Makeup Primer
Primer is applied before makeup, smoothing out the skin to make a good base, and helps your makeup last longer without smudging. The two main types of primer are foundation primer which is applied all over your face before foundation, and eye primer, which is applied on your eyelid before eye makeup.
I personally do not use foundation primer (because I'm lazy), but eye primer is something I have used quite obsessively since I discovered it! I have noticed that my eyeshadow colours look much more vibrant and holds better when I use a primer, and my eyeliner does not smudge off like it used to.

La Splash Eyeshadow Base/Sealer
6. Eyeliner
A basic black or brown eyeliner is very easy to find, and even one of decent quality shouldn't cost a fortune. There are 3 main types of eyeliner: Pencil liner, liquid liner, and gel liner.
Pencil liner is great to begin with, it smudges out quite easily for a softer look, and is usually easier to remove, and harder to mess up with.
Liquid liner can come in a little container with a brush, or as a brush pen. I find pen liquid liners to be the most convenient and easy to use, and is great if you want darker, sharper lines. I usually carry around a pen liquid liner when I go out, since it's great for quick makeup touchups.
Gel liner is similar to liquid liner, it generally comes in a little container, sometimes with a brush (However, I'd recommend buying your own brush, a small angled brush is best). I find that gel liner tends to last longer, so I actually prefer to use gel liner over liquid liner when I cosplay or wear heavy makeup.

Rimmel Exaggerate Liquid Liner, MAC Smolder Eye Kohl, Heavy Rotation Gel Liner, Super Skinny Eye Marker
7. Eyeshadow
A small palette of eyeshadows in colours that are flattering to your features may not seem like much, but it can really help brighten up your eyes. For a natural look, you want to stick to beiges and browns, mostly just to create a bit more depth, but I personally love experimenting with lots of different colours and combinations of eyeshadows to create new looks.
My recommendation would be to buy an assortment of inexpensive eyeshadows to try out in order to find your best colours, before investing more money into good quality ones. Remember, your favourite colours aren't always the ones that look best! (Another thing I learned the hard way...)
Eyeshadows can also be used to fill in and define your eyebrows, giving you a nicer, tidier look overall. (I don't really like eyebrow pencils, they are a bit too harsh looking for my tastes~)

88 Colour Eyeshadow Palette, L.A. Girl Mega Pearl Eyeshadows, Maybelline Eye Studio Palette
8. Mascara
Although I have a small obsession with wearing false eyelashes, a good quality mascara is still something I consider really important to have.
Mascara is something that is worth paying a proper amount for, cheap mascaras just don't cut it, especially if you have short eyelashes. I find that curling your eyelashes and applying mascara really opens up the eyes. Layering different mascaras is great if you have short eyelashes, using a lengthening mascara under a thickening one can really give your eyelashes (and your overall look) a huge boost!
For school, I'm usually too lazy to put on much makeup at all, but I almost always curl and mascara my eyelashes. I only use waterproof mascara because it holds curl better, the other ones weigh my eyelashes down~

Maybelline Lash Stiletto
9. Makeup Remover
As great as makeup is, it is obviously not good for your skin if it is left on for a long time, so a good makeup remover is almost just as important as good makeup. Acne/pimples/blemishes can be easily caused by not removing your makeup properly, and can be just as easily prevented. Make sure to get a good makeup remover that works for your skin type, especially is you have sensitive skin like me. I find that many makeup removers irritate my skin, so do be careful when you buy one!

Jurlique Cleansing Lotion, La Prairie Cleansing Water
10. Facial Cleanser/Scrub
Cleansing and exfoliating is quite basic skincare. It removes impurities, as well as dead skin cells, giving you nicer, smoother skin. There are so many types of cleaners and scrubs to choose from(Blackhead removing, oil control, brightening etc.), so it's probably best to choose a few, and switch between products regularly for a wider range of benefits, and so that your skin does not get immune to it.
When it comes to scrubs, be careful when choosing one if you have sensitive skin. Very coarse scrubs can irritate your skin, and cause more harm than good. Try to find a product with less and smaller grains in it~

Nivea Visage Gentle Exfoliating Scrub, Baviphat Mango Steam Scrub, Neutrogena Rapid Clear
Other Highly Recommended Products:
- A good lip gloss/lipstick/lip stain

- A white/pale/glitter eyeliner to brighten up the eyes

- Good quality false eyelashes and glue (Smaller pairs can look quite natural, not too obviously fake~)

And that's it! I know it might sound like a lot to have, but trust me, it really isn't~ XD
Over the years, without even trying to, I've built up quite a large collection of makeup, much more than what I have suggested here! ^^;
It's not much compared to those (lucky) people with entire suitcases full of makeup, but it's quite a bit for a teenager with strict and disapproving asian parents~ XD
And another thing: Even if you don't finish using a makeup product, don't just keep it for ages! If you use very old makeup, it can irritate your skin and eyes! >_<
As a very rough guide, never keep liquid/cream products (Liquid eyeliner, mascara, liquid/cream foundation etc.) for longer than a year, and dry products (Power eyeshadows, powder foundation etc.) should be replaced at very least once every two years. Note that these are the absolute maximum time limits, most people would tell you to replace these products much more often!
I hope that you guys will find this guide somewhat useful!~ ^^
~アキ
P.S. Please leave a vote on my polls so I know what I should post next!~ ^^
Tuesday, 22 November 2011
Skin79 Super+ Beblesh Balm (BB Cream) Review~
Hey guys!~ ^^
Sorry for not posting for so long~ I've been very busy with exams lately, but I'll definitely try to get a few more makeup tutorials and cosplay shoot photos up soon!~ :D
So today I bought my second BB cream(I've tried 4 different ones so far), and I absolutely love it, so since I have next to nothing to do, I decided to write a review for it~
This is my first makeup review, I'll try my best!~ ^^
The BB cream I will be reviewing is Skin79's Super+ Beblesh Balm~

I got this from a little shop near Chinatown for $35AUD, although I have seen it in a few other shops in the area for a bit more ($40-$60).
It is supposed to have 'Triple Functions', whitening, UV protection SPF25 and wrinkle prevention~
Packaging Design: 10/10
I absolutely love the designs of the box and container! Although I'm not a huge fan of the colour pink, the simple but nice design really stood out to me, and was one of the reasons that I bought it. Yay for impulse buying? ^^;
I think that the little pink bottle is really cute and pretty (Yes, I am a weirdo that finds bottles cute XD), and the pump is very easy to use~
Coverage and Colour: 7.5/10

 The coverage is medium-light, it works nicely as a light foundation if you have pretty good skin, and it is buildable if you want more coverage, but it might not cover any large/dark blemishes or acne. I like to first use a little bit of concealer on any very dark blemishes or dark under eye circles before putting on the BB cream. It also has quite a dewy finish, but I personally prefer my skin to be a bit more matte, so I also like to but a light layer of powder over it.
This BB cream is not very pale, it is only a little bit lighter than the skin on my face (I am slightly paler than average Asian person I guess? About a NC20-NC25), and I really like it, since I prefer to look lighter rather than darker. This BB cream might be a bit too light for anyone whose skin is tanner than average.
It also seems to have a bit of a grey-ish undertone as opposed to a yellow or pink undertone. I actually really like this, as it helps cover up redness quite well, which I something I often have a problem with.
Consistancy and Feel: 8/10
The consistency is about the same most liquid foundations. It blends out very easily and quite thinly, and doesn't feel heavy even when I build up a few layers.
Moisturising/Oil Control: 9/10
My skin is quite dry, apart from my nose which can get quite oily. Most of my face often tends to feel dry when I only wear powder foundation for more than a few hours, even after I moisturize, especially since I wear my foundation quite thick when I cosplay. However, if I wear a layer or two of this BB cream under powder foundation, my skin feels significantly less dry than the usual.
As for oil control, it also seemed to help. When I go out, only wearing powder foundation, I find that on average, I need to powder over my nose every 3 or so hours. However, when I wore this BB cream under my cosplay makeup for about 10 hours on Sunday, I only had to powder over it once for the entire day~
My makeup did not flake off or rub off at all like it usually does either, so I would really recommend this as a makeup base for those of you who like to sometimes wear heavy makeup like me~
This BB cream seems to work quite well for my skin, which is quite dry in some places, and slightly oily in others, so I think that it would be appropriate for most skin types other than the extremes.
Smell: 8/10
The smell is quite pleasant and light, but nothing amazing. If I had to describe it's I'd say that it smells sort of like perfume mixed with a little bit of baby powder?
Whitening/UV Protection/Wrinkle Improvement:
My skin tone changes on an almost daily basis depending on the amount of sleep I get, and I don't go out in the sun much, so I'm probably not the best person to judge the effects of whitening and UV protection. As for wrinkle improvement... I'll tell you guys in about 20 years? XD (Jk~~)
Negative Effects?:
I have quite sensitive (read: annoying) skin that reacts badly to many types of chemicals, and a few types of makeup, but this BB cream has not caused me to have any breakouts or rashes after using it for a week. I would say that it is quite safe to use on most skin types, but always be careful, and test a small amount of the product on your skin first if you know you have allergies or sensitive skin!
Overall Rating: 8.5
Would I recommend it?
Yes, I would definitely recommend this! Out of the BB creams I have tried so far (Baviphat Sugar Girl Moist Collagen, Baviphat Magic Girls, Garnier Miracle Skin Perfector, Skin79 Super+), I definitely like this one the best!
I would recommend this to anyone with light to medium skin tone, who is looking for a medium, natural coverage, or a just great base to use under thicker makeup~ ^^
Sorry for not posting for so long~ I've been very busy with exams lately, but I'll definitely try to get a few more makeup tutorials and cosplay shoot photos up soon!~ :D
So today I bought my second BB cream(I've tried 4 different ones so far), and I absolutely love it, so since I have next to nothing to do, I decided to write a review for it~
This is my first makeup review, I'll try my best!~ ^^
The BB cream I will be reviewing is Skin79's Super+ Beblesh Balm~

I got this from a little shop near Chinatown for $35AUD, although I have seen it in a few other shops in the area for a bit more ($40-$60).
It is supposed to have 'Triple Functions', whitening, UV protection SPF25 and wrinkle prevention~
Packaging Design: 10/10
I absolutely love the designs of the box and container! Although I'm not a huge fan of the colour pink, the simple but nice design really stood out to me, and was one of the reasons that I bought it. Yay for impulse buying? ^^;
I think that the little pink bottle is really cute and pretty (Yes, I am a weirdo that finds bottles cute XD), and the pump is very easy to use~
Coverage and Colour: 7.5/10


This BB cream is not very pale, it is only a little bit lighter than the skin on my face (I am slightly paler than average Asian person I guess? About a NC20-NC25), and I really like it, since I prefer to look lighter rather than darker. This BB cream might be a bit too light for anyone whose skin is tanner than average.
It also seems to have a bit of a grey-ish undertone as opposed to a yellow or pink undertone. I actually really like this, as it helps cover up redness quite well, which I something I often have a problem with.
Consistancy and Feel: 8/10
The consistency is about the same most liquid foundations. It blends out very easily and quite thinly, and doesn't feel heavy even when I build up a few layers.
Moisturising/Oil Control: 9/10
My skin is quite dry, apart from my nose which can get quite oily. Most of my face often tends to feel dry when I only wear powder foundation for more than a few hours, even after I moisturize, especially since I wear my foundation quite thick when I cosplay. However, if I wear a layer or two of this BB cream under powder foundation, my skin feels significantly less dry than the usual.
As for oil control, it also seemed to help. When I go out, only wearing powder foundation, I find that on average, I need to powder over my nose every 3 or so hours. However, when I wore this BB cream under my cosplay makeup for about 10 hours on Sunday, I only had to powder over it once for the entire day~
My makeup did not flake off or rub off at all like it usually does either, so I would really recommend this as a makeup base for those of you who like to sometimes wear heavy makeup like me~
This BB cream seems to work quite well for my skin, which is quite dry in some places, and slightly oily in others, so I think that it would be appropriate for most skin types other than the extremes.
Smell: 8/10
The smell is quite pleasant and light, but nothing amazing. If I had to describe it's I'd say that it smells sort of like perfume mixed with a little bit of baby powder?
Whitening/UV Protection/Wrinkle Improvement:
My skin tone changes on an almost daily basis depending on the amount of sleep I get, and I don't go out in the sun much, so I'm probably not the best person to judge the effects of whitening and UV protection. As for wrinkle improvement... I'll tell you guys in about 20 years? XD (Jk~~)
Negative Effects?:
I have quite sensitive (read: annoying) skin that reacts badly to many types of chemicals, and a few types of makeup, but this BB cream has not caused me to have any breakouts or rashes after using it for a week. I would say that it is quite safe to use on most skin types, but always be careful, and test a small amount of the product on your skin first if you know you have allergies or sensitive skin!
Overall Rating: 8.5
Would I recommend it?
Yes, I would definitely recommend this! Out of the BB creams I have tried so far (Baviphat Sugar Girl Moist Collagen, Baviphat Magic Girls, Garnier Miracle Skin Perfector, Skin79 Super+), I definitely like this one the best!
I would recommend this to anyone with light to medium skin tone, who is looking for a medium, natural coverage, or a just great base to use under thicker makeup~ ^^
~アキ
Friday, 24 June 2011
False Eyelash Tutorial~
Hi everyone! ^^
A friend of mine asked me for a tutorial on how to put on false eyelashes, so here is it! Just a quick tutorial with mostly pretty basic stuff, along with a few tips that I find useful, so hopefully this will be helpful to some people! :D
A friend of mine asked me for a tutorial on how to put on false eyelashes, so here is it! Just a quick tutorial with mostly pretty basic stuff, along with a few tips that I find useful, so hopefully this will be helpful to some people! :D
Things You Need

Fake Eyelashes (Duh XD)
Eyelash Glue (Must be of decent quality!!! More about this later)
Tweezers (Optional)
Any other makeup you want to wear~
Before putting on the eyelashes, I would recommend applying all the other makeup you’re planning to wear. Make sure to curl your eyelashes and put mascara on them (especially if your eyelashes are not black), so that they blend in with the false ones!

When it comes to eyelash glue, never use the ones that come with the eyelashes, unless they are of very good quality, which many are not. Make sure to buy some proper eyelash glue. Glue that is of bad quality will not stick properly, and even if it does, it will not last for very long and become very annoying, it’s worth buying a proper one!
You don't even need to buy an expensive one, the ones that I have used in the past have all been around $5 and they work very well! ^^
You don't even need to buy an expensive one, the ones that I have used in the past have all been around $5 and they work very well! ^^
Apply an even line of the glue along the base of the eyelash. Make sure to cover the base well, without applying too much, or it will take too long to dry.

One of the most common mistakes people seem to make when putting on fake eyelashes is not waiting for the glue to dry a bit before try to stick them on. After applying the glue, blow on the glue and wait until it is half transparent (About 10-20 seconds) before trying to put them on! If you do not wait for the glue to dry, it is much less sticky and does not stick as well.
When you the glue is half dried, use either your fingers or tweezers (I don’t use them, but I know that some people like to) to position the eyelash along the curve of your eye, and stick it down, making sure to keep some pressure on it until it is completely glued on and does not move. I prefer to stick my eyelashes about 0.5cm away from the inner corner of my eye as that is more comfortable~


Top layer done!
If you want to apply more layers , make sure to stick them right above the first layer so that it doesn’t end up looking weird~
The next part is regarding bottom eyelashes~
If you choose to wear them, the method is almost the same as applying top eyelashes.
First, apply the glue as evenly as possible, waiting about 20 seconds for the glue to become more sticky before sticking them on. Bottom eyelashes tend to be harder to fit onto your eye so make sure that they are positioned correctly before sticking them on!

If you wearing wearing eyeliner on the bottom lid which does not follow your natural lashline very closely, stick the eyelashes closer to the eyeliner’s edge, as this will make the shape of the eyeliner seem more convincing~


And you’re done!
I hope that this will help a few people~ :3
(A big thank you to http://hiddendelights.deviantart.com/ for helping me take photos~ XD)
If you have any questions, feel free to leave a comment here, or at http://bbchibi.deviantart.com/ ^^
(A big thank you to http://hiddendelights.deviantart.com/ for helping me take photos~ XD)
If you have any questions, feel free to leave a comment here, or at http://bbchibi.deviantart.com/ ^^
~アキ
Tuesday, 21 June 2011
Light Gothic Makeup (Yuuki Cross from Vampire Knight)~

I’m not sure if the term ‘light’ gothic makeup even exists… But that’s just what I call this! XD
I’ll actually be wearing this style of makeup for my Rima Touya cosplay, but unfortunately, I don’t have the wig for her yet, and since my hair is quite similar to Yuuki, who has almost the same face as her, I’m going with that instead XD
It can also be used for different characters too, such as characters that are quite gothic, with very round eyes that are quite heavily lined, for example, most of the girls in Vampire Knight, Misa from Death Note and Ai Enma from Hell Girl just to name a few~ ^^
I will just be using mostly natural eyeshadow colours, along with a little bit of grey/black, since Yuuki does not seem to wear any coloured eyeshadow, but if your character does, make sure to change it accordingly! This tutorial will be quite generalized~ ^^
Things you’ll need~
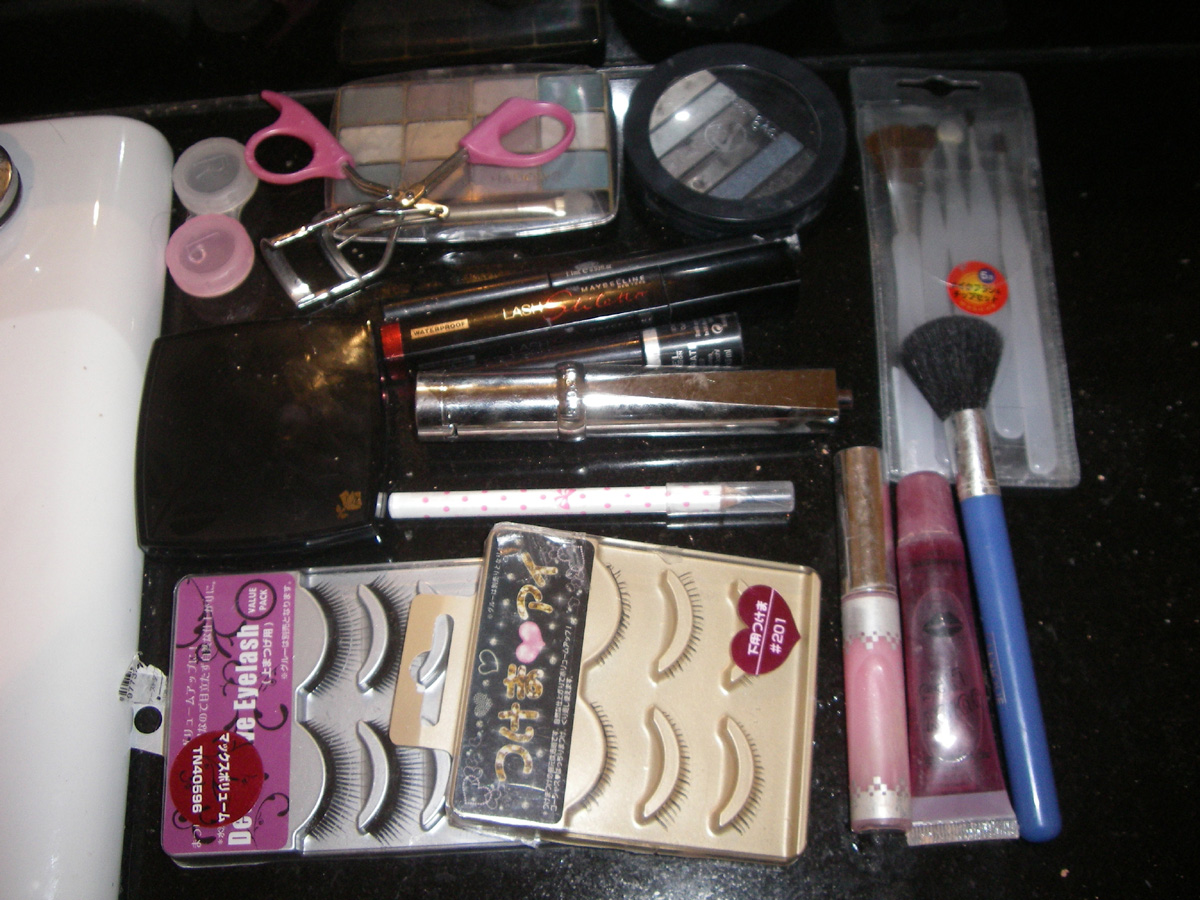
Concealer (Recommended)
Foundation
Highlighter and Bronzer (Alternatively, lighter and darker powder foundations)
Large Brush
Loose Powder (Optional)
Eyelash Curler
Primer (Recommended)
Eyeshadow Brushes (Preferably a small brush, but a range of different ones is better)
Eyeshadow Palette (Natural or monochromatic colours)
Black Liquid or Gel Eyeliner
White Eyeliner (Recommended)
Black Mascara
False Eyelashes and Eyelash Glue
Eyeshadow or Eyebrow Pencil in Preferred Colour
Pale lipstick/gloss
First of all, make sure your face is clean, and moisturized! You don’t want your skin to dry out and be uncomfortable, not to mention it will look bad~ >_<
If you wear contact lenses (which I would REALLY recommend, since they do make a huge difference and make your eyes look much bigger!), put them on before starting to put on makeup. Make sure to wash your hands carefully!
I am wearing Geo Xtra WT-A0, they’re 15mm and have a black ring around the edge, so they really enlarge the eyes! (I know they’re the wrong colour, but the proper ones I ordered haven’t arrived yet >_<)
I am wearing Geo Xtra WT-A0, they’re 15mm and have a black ring around the edge, so they really enlarge the eyes! (I know they’re the wrong colour, but the proper ones I ordered haven’t arrived yet >_<)
Use concealer to cover any pimples, blemishes, dark circles under eyes and so on, and then apply foundation all over your face(not too thickly though! Just enough to make your skin look smooth), and make sure to blend it into your hairline/neck!
For this look, I am using a foundation slightly paler than my usual skin tone, as gothic characters (and vampires XD) tend to be quite pale. Make sure to use foundation no more than 1 or 2 shades paler than your own skin, or else it will look very strange and will be very hard to blend~
Having all that foundation on really tends to flatten out the face, but that can be fixed easily! Starting with the bronzer/darker foundation, brush it under your cheekbones and across to your jawline. Also dust the bronzer across the sides of your face, from the jaw up to around the sides of your eyes, to give the illusion of a smaller face, as most anime girls tend to have very small pointed faces (Which I do not have T_T).

Make sure to use a big brush, and a powder that is not too dark, or else it might make hard lines and look dirty.
Using a smaller brush, apply the bronzer along the sides of your nose to make it look thinner and more pointed as the shadow created by the powder will make the sides of the nose look further away (If that makes sense? XD).

Make sure not to overdo this, or you will end up looking very masculine instead~
Then, using the big brush again, put the highlighting powder/lighter foundation along the bridge of your nose and the highest points of your cheeks.

Now the face should much less flat than before~ XD
If you like, you can dust some loose powder over the face at this point to set all of the foundation and powders~
Next is the most important part, the eye makeup! Before starting, curl your eyelashes. Do not curl them so that they are pointing straight upwards, that will look strange, and will not blend in with the fake lashes. Put primer all over your eyelids, and a little but under your eyes. This is optional, but primer makes your makeup stay on for much longer without smudging, so it’s really great. Make sure to blend it into the foundation~
Starting with a pale shade of eyeshadow, such as a beige, apply it thinly all over your eyelid up to the eyebrow and blend it out well.
With a medium brown eyeshadow, use a small brush to apply it where the skin around the eye sinks into the eye socket. Now, if you are like me and do not have much of a visable crease, get the brush without the eyeshadow and poke around the eye (carefully!), where the skin easily sinks in is where you should apply it. Concentrate the eyeshadow in the outer corner of the eye, using less towards the inner corner of the eye. This contours the eye slightly, making it stand out more.

Then, use a dark brown or a grey, and put it onto the outer corner of the eye crease to darker it further. Make sure it is all well blended!

Get a very light eyeshadow such as a pearly white, and apply it on your browbone, just under the eyebrow.

Now to the eyeliner~ ^^
Apply the eyeliner in a medium or thick line close to the lashline, extending only slightly past the outer corner of the eye, as for this look, you want to make the eye rounder rather than elongate it. Make the line thicker towards the middle and outer parts, as this also makes the eye seem rounder.
Apply the eyeliner in a medium or thick line close to the lashline, extending only slightly past the outer corner of the eye, as for this look, you want to make the eye rounder rather than elongate it. Make the line thicker towards the middle and outer parts, as this also makes the eye seem rounder.

Along the outer third of the eye, continue the eyeliner from the top of the eye downwards, making sure to make both ends of the joint smooth. I like to draw this part quite thickly, as I have slightly slanted (asian XD) eyes, and want to draw attention away from this~

OMG I have eyes now~ XD
Then, line the inner third of the eye thinly. I also draw a small point downwards (slightly diagonally inwards) from the innermost part the eye, as my eyes are spaced a little bit widely, and it makes the eyes look slightly more close together and a bit bigger.

Using a small brush, use a dark brown, dark grey or black eyeshadow and blend out the lower eyeliner slightly, as well as applying it in the middle third to join them together. This can be done with a pencil liner if preferred~

Apply white eyeliner around the inner corner of the eye and along the inner half of the eye, under the eyeliner, making sure not to go over it. If you do not have a white eyeliner, a white/light eyeshadow will do. This really opens up the eyes and makes them stand out~

Put on one layer of mascara, and wait for it to dry before continuing. The type and amount of fake eyelashes worn depends of personal preference, but this is just my favourite way to wear them~
(For those who are not very familiar with using fake eyelashes and/or has trouble with them, just ask and I’ll be happy to do a small tutorial on that! ^^)
Starting with one eyelash that is at least the entire length of your eye, if not slightly longer, stick it very slightly above your top lashline. And I mean VERY, if you stick it too far away, it won’t look right. Doing this makes the eye seem bigger and rounder~


Next, have an eyelash that is slightly shorter than the length of your eye (About 0.5-1cm shorter), and stick it right above the first eyelash, right in the middle. This further enhances the roundness of the eye.

If you choose to use lower eyelashes, stick them along the shape of the eyeliner rather than the actual eyeline, so that the illusion of wider eyes created by the eyeliner is even more convincing.

Some people find this to be a bit much, but I also stick half of a (slightly trimmed) eyelash made for the top lid on the outer corner of the lower eyelid to create an even more dramatic effect~

Fill in your eyebrows with a colour to match your wig. If you have thick and/or dark eyebrows, I would recommend plucking or waxing them into the correct shape. It really does makes a big difference! I trim my eyebrows quite short, so that colours will show through even though my eyebrows are very black. For this character, I’m using a dark brown eyeshadow to fill in my eyebrows.
I forgot to take a photo of this step… but it’s pretty self explanatory~ ^^;
Apply a pale lipstick or coloured gloss. Most anime characters have little or no lip colour, but of course, that would just look freaky on a real person, so just lightening the lips will do. I also put on a layer of clear (slightly sparkly) gloss so that it will last longer~

Now, just fix up your eyeliner and shadows a bit if you need to, put on your costume and wig, and you’re all set!

Not sure whu my face looks so long here... Weird angles O_o

No wig, but you get the idea XD
I hope that this tutorial was alright and will be useful to some people~ I’d love to hear feedback! ^^
Also, if there a specific character or style of makeup that you would like to see a tutorial for, feel free to ask!
UPDATE 25/06/11
This is how this makeup looked with my Rima wig~ ^^

I will be uploading a few of my favourite photos on my DeviantArt, and even more on this blog soon! ^^
~アキ
Subscribe to:
Posts (Atom)