
I’m not sure if the term ‘light’ gothic makeup even exists… But that’s just what I call this! XD
I’ll actually be wearing this style of makeup for my Rima Touya cosplay, but unfortunately, I don’t have the wig for her yet, and since my hair is quite similar to Yuuki, who has almost the same face as her, I’m going with that instead XD
It can also be used for different characters too, such as characters that are quite gothic, with very round eyes that are quite heavily lined, for example, most of the girls in Vampire Knight, Misa from Death Note and Ai Enma from Hell Girl just to name a few~ ^^
I will just be using mostly natural eyeshadow colours, along with a little bit of grey/black, since Yuuki does not seem to wear any coloured eyeshadow, but if your character does, make sure to change it accordingly! This tutorial will be quite generalized~ ^^
Things you’ll need~
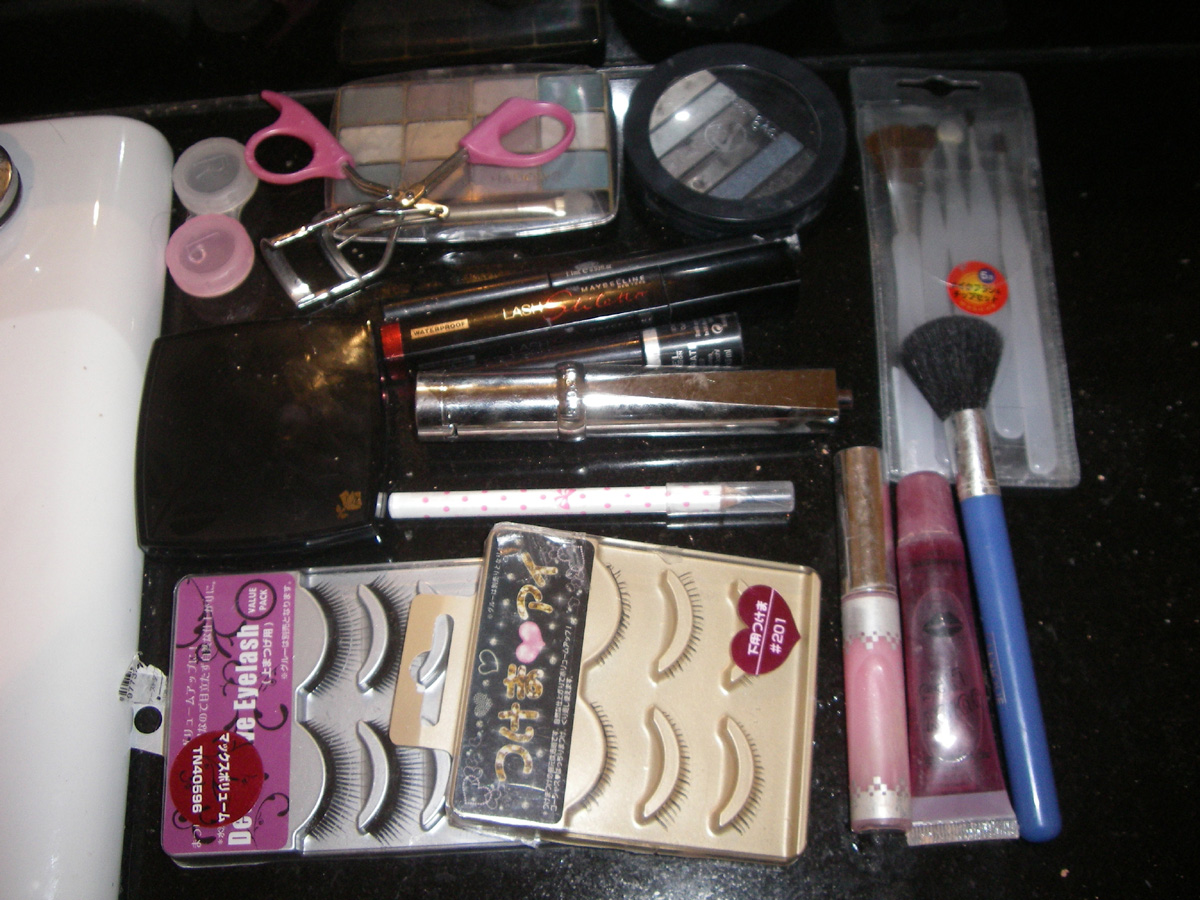
Concealer (Recommended)
Foundation
Highlighter and Bronzer (Alternatively, lighter and darker powder foundations)
Large Brush
Loose Powder (Optional)
Eyelash Curler
Primer (Recommended)
Eyeshadow Brushes (Preferably a small brush, but a range of different ones is better)
Eyeshadow Palette (Natural or monochromatic colours)
Black Liquid or Gel Eyeliner
White Eyeliner (Recommended)
Black Mascara
False Eyelashes and Eyelash Glue
Eyeshadow or Eyebrow Pencil in Preferred Colour
Pale lipstick/gloss
First of all, make sure your face is clean, and moisturized! You don’t want your skin to dry out and be uncomfortable, not to mention it will look bad~ >_<
If you wear contact lenses (which I would REALLY recommend, since they do make a huge difference and make your eyes look much bigger!), put them on before starting to put on makeup. Make sure to wash your hands carefully!
I am wearing Geo Xtra WT-A0, they’re 15mm and have a black ring around the edge, so they really enlarge the eyes! (I know they’re the wrong colour, but the proper ones I ordered haven’t arrived yet >_<)
I am wearing Geo Xtra WT-A0, they’re 15mm and have a black ring around the edge, so they really enlarge the eyes! (I know they’re the wrong colour, but the proper ones I ordered haven’t arrived yet >_<)
Use concealer to cover any pimples, blemishes, dark circles under eyes and so on, and then apply foundation all over your face(not too thickly though! Just enough to make your skin look smooth), and make sure to blend it into your hairline/neck!
For this look, I am using a foundation slightly paler than my usual skin tone, as gothic characters (and vampires XD) tend to be quite pale. Make sure to use foundation no more than 1 or 2 shades paler than your own skin, or else it will look very strange and will be very hard to blend~
Having all that foundation on really tends to flatten out the face, but that can be fixed easily! Starting with the bronzer/darker foundation, brush it under your cheekbones and across to your jawline. Also dust the bronzer across the sides of your face, from the jaw up to around the sides of your eyes, to give the illusion of a smaller face, as most anime girls tend to have very small pointed faces (Which I do not have T_T).

Make sure to use a big brush, and a powder that is not too dark, or else it might make hard lines and look dirty.
Using a smaller brush, apply the bronzer along the sides of your nose to make it look thinner and more pointed as the shadow created by the powder will make the sides of the nose look further away (If that makes sense? XD).

Make sure not to overdo this, or you will end up looking very masculine instead~
Then, using the big brush again, put the highlighting powder/lighter foundation along the bridge of your nose and the highest points of your cheeks.

Now the face should much less flat than before~ XD
If you like, you can dust some loose powder over the face at this point to set all of the foundation and powders~
Next is the most important part, the eye makeup! Before starting, curl your eyelashes. Do not curl them so that they are pointing straight upwards, that will look strange, and will not blend in with the fake lashes. Put primer all over your eyelids, and a little but under your eyes. This is optional, but primer makes your makeup stay on for much longer without smudging, so it’s really great. Make sure to blend it into the foundation~
Starting with a pale shade of eyeshadow, such as a beige, apply it thinly all over your eyelid up to the eyebrow and blend it out well.
With a medium brown eyeshadow, use a small brush to apply it where the skin around the eye sinks into the eye socket. Now, if you are like me and do not have much of a visable crease, get the brush without the eyeshadow and poke around the eye (carefully!), where the skin easily sinks in is where you should apply it. Concentrate the eyeshadow in the outer corner of the eye, using less towards the inner corner of the eye. This contours the eye slightly, making it stand out more.

Then, use a dark brown or a grey, and put it onto the outer corner of the eye crease to darker it further. Make sure it is all well blended!

Get a very light eyeshadow such as a pearly white, and apply it on your browbone, just under the eyebrow.

Now to the eyeliner~ ^^
Apply the eyeliner in a medium or thick line close to the lashline, extending only slightly past the outer corner of the eye, as for this look, you want to make the eye rounder rather than elongate it. Make the line thicker towards the middle and outer parts, as this also makes the eye seem rounder.
Apply the eyeliner in a medium or thick line close to the lashline, extending only slightly past the outer corner of the eye, as for this look, you want to make the eye rounder rather than elongate it. Make the line thicker towards the middle and outer parts, as this also makes the eye seem rounder.

Along the outer third of the eye, continue the eyeliner from the top of the eye downwards, making sure to make both ends of the joint smooth. I like to draw this part quite thickly, as I have slightly slanted (asian XD) eyes, and want to draw attention away from this~

OMG I have eyes now~ XD
Then, line the inner third of the eye thinly. I also draw a small point downwards (slightly diagonally inwards) from the innermost part the eye, as my eyes are spaced a little bit widely, and it makes the eyes look slightly more close together and a bit bigger.

Using a small brush, use a dark brown, dark grey or black eyeshadow and blend out the lower eyeliner slightly, as well as applying it in the middle third to join them together. This can be done with a pencil liner if preferred~

Apply white eyeliner around the inner corner of the eye and along the inner half of the eye, under the eyeliner, making sure not to go over it. If you do not have a white eyeliner, a white/light eyeshadow will do. This really opens up the eyes and makes them stand out~

Put on one layer of mascara, and wait for it to dry before continuing. The type and amount of fake eyelashes worn depends of personal preference, but this is just my favourite way to wear them~
(For those who are not very familiar with using fake eyelashes and/or has trouble with them, just ask and I’ll be happy to do a small tutorial on that! ^^)
Starting with one eyelash that is at least the entire length of your eye, if not slightly longer, stick it very slightly above your top lashline. And I mean VERY, if you stick it too far away, it won’t look right. Doing this makes the eye seem bigger and rounder~


Next, have an eyelash that is slightly shorter than the length of your eye (About 0.5-1cm shorter), and stick it right above the first eyelash, right in the middle. This further enhances the roundness of the eye.

If you choose to use lower eyelashes, stick them along the shape of the eyeliner rather than the actual eyeline, so that the illusion of wider eyes created by the eyeliner is even more convincing.

Some people find this to be a bit much, but I also stick half of a (slightly trimmed) eyelash made for the top lid on the outer corner of the lower eyelid to create an even more dramatic effect~

Fill in your eyebrows with a colour to match your wig. If you have thick and/or dark eyebrows, I would recommend plucking or waxing them into the correct shape. It really does makes a big difference! I trim my eyebrows quite short, so that colours will show through even though my eyebrows are very black. For this character, I’m using a dark brown eyeshadow to fill in my eyebrows.
I forgot to take a photo of this step… but it’s pretty self explanatory~ ^^;
Apply a pale lipstick or coloured gloss. Most anime characters have little or no lip colour, but of course, that would just look freaky on a real person, so just lightening the lips will do. I also put on a layer of clear (slightly sparkly) gloss so that it will last longer~

Now, just fix up your eyeliner and shadows a bit if you need to, put on your costume and wig, and you’re all set!

Not sure whu my face looks so long here... Weird angles O_o

No wig, but you get the idea XD
I hope that this tutorial was alright and will be useful to some people~ I’d love to hear feedback! ^^
Also, if there a specific character or style of makeup that you would like to see a tutorial for, feel free to ask!
UPDATE 25/06/11
This is how this makeup looked with my Rima wig~ ^^

I will be uploading a few of my favourite photos on my DeviantArt, and even more on this blog soon! ^^
~アキ
Your tutorial is very helpful and your cosplays are amazing! [seeing as I found your blog through yout dA]
ReplyDeleteI hope to see more of your works!
HI
ReplyDeleteis that I found very interesting your make up
and I was willing to do cosplay of Hinamori amu shugo chara
so wanted to see if you could do a make up of it because I've not found make it up
D =
please
you is very cute